Introduction
In this blog post, we are going to take a look at how to create a well-structured log system in Node JS using Express JS, Morgan, and Winston.
- Morgan is a Node.js and Express middleware to log HTTP requests and errors.
- Winston is a logger for just about everything. It includes support for multiple storage options and log levels, log queries, and even a built-in profiler.
I was looking for a robust logging system for a crypto dashboard API that I built one month ago and I found this article: https://levelup.gitconnected.com/better-logs-for-expressjs-using-winston-and-morgan-with-typescript-1c31c1ab9342 very useful. The sample made in the article is TypeScript based. So, if you’re trying to use TypeScript instead of Js, you don’t need to continue reading the current post, just check out the link. In my crypto project, I hadn’t used TypeScript, that’s why I am writing this blog post.
Prerequisites
To follow along with this article, you will need:
- Node.js & npm - includes the Node.js runtime, command-line tools, and package manager, install it from https://nodejs.org/.
- A code editor or an IDE that supports JS: Visual Studio Code, WebStorm, …etc.
Setting Up the Project
- Create a new directory named
express-morgan-winstonfor your project - Initialize a new Node project inside the directory using the
npm initcommand - Install
express,morgan,andwinstonas dependencies - Create your entry file (provided when using the
npm initcommand:app.jsin my case). This is where you will handle the main logic in your Express server
mkdir express-morgan-winston
cd express-morgan-winston
npm init
npm install morgan winston --save
touch src/app.js # or mdkdir src && echo "" > src/app.js
Configure Winston
Basically, we need to define :
- Log severity levels in the development and production environments.
- Different colors for each level (log messages will be printed in console and saved to files)
- The type of transport: console, file, or both.
Create a file src/utils/logger.js and copy-paste the code below. All parts of the configuration are well explained.
const winston = require('winston');
// Define your severity levels.
// With them, You can create log files,
// see or hide levels based on the running ENV.
const levels = {
  error: 0,
  warn: 1,
  info: 2,
  http: 3,
  debug: 4,
}

// This method set the current severity based on
// the current NODE_ENV: show all the log levels
// if the server was run in development mode; otherwise,
// if it was run in production, show only warn and error messages.
const level = () => {
  const env = process.env.NODE_ENV || 'development'
  const isDevelopment = env === 'development'
  return isDevelopment ? 'debug' : 'warn'
}

// Define different colors for each level.
// Colors make the log message more visible,
// adding the ability to focus or ignore messages.
const colors = {
  error: 'red',
  warn: 'yellow',
  info: 'green',
  http: 'magenta',
  debug: 'white',
}

// Tell winston that you want to link the colors
// defined above to the severity levels.
winston.addColors(colors)

// Chose the aspect of your log customizing the log format.
const format = winston.format.combine(
  // Add the message timestamp with the preferred format
  winston.format.timestamp({ format: 'YYYY-MM-DD HH:mm:ss:ms' }),
  // Tell Winston that the logs must be colored
  winston.format.colorize({ all: true }),
  // Define the format of the message showing the timestamp, the level and the message
  winston.format.printf(
    (info) => `${info.timestamp} ${info.level}: ${info.message}`,
  ),
)

// Define which transports the logger must use to print out messages.
// In this example, we are using three different transports
const transports = [
  // Allow the use the console to print the messages
  new winston.transports.Console(),
  // Allow to print all the error level messages inside the error.log file
  new winston.transports.File({
    filename: 'logs/error.log',
    level: 'error',
  }),
  // Allow to print all the error message inside the all.log file
  // (also the error log that are also printed inside the error.log(
  new winston.transports.File({ filename: 'logs/all.log' }),
]

// Create the logger instance that has to be exported
// and used to log messages.
const logger = winston.createLogger({
  level: level(),
  levels,
  format,
  transports,
})

module.exports = logger
We have a logger utility file that is ready for use anywhere in our express app. Now let’s configure Morgan.
Configure Morgan
The configuration we need to make here is very simple:
- Define the logger we created as default instead of console.log
- Define The message format that morgan middleware should use when it handles requests and tries to write logs.
So I created the file src/middlewares/morgan.middleware.js and add the following code:
const morgan = require("morgan");
const logger = require("../utils/logger");

const stream = {
  // Use the http severity
  write: (message) => logger.http(message),
};

const skip = () => {
  const env = process.env.NODE_ENV || "development";
  return env !== "development";
};

const morganMiddleware = morgan(
  // Define message format string (this is the default one).
  // The message format is made from tokens, and each token is
  // defined inside the Morgan library.
  // You can create your custom token to show what do you want from a request.
  ":remote-addr :method :url :status :res[content-length] - :response-time ms",
  // Options: in this case, I overwrote the stream and the skip logic.
  // See the methods above.
  { stream, skip }
);

module.exports = morganMiddleware;
Add the morgan middleware to the ExpressJS server
const express = require("express");
const morganMiddleware = require("./middlewares/morgan.middleware");

// The morgan middleware does not need this.
// This is for a manual log
const logger = require("./utils/logger");

const app = express();

// Add the morgan middleware
app.use(morganMiddleware);

app.get("/api/status", (req, res) => {
    logger.info("Checking the API status: Everything is OK");
    res.status(200).send({
        status: "UP",
        message: "The API is up and running!"
    });
});

// Startup
app.listen(3000, () => {
    logger.info('Server is running on port 3000');
});
Run the app
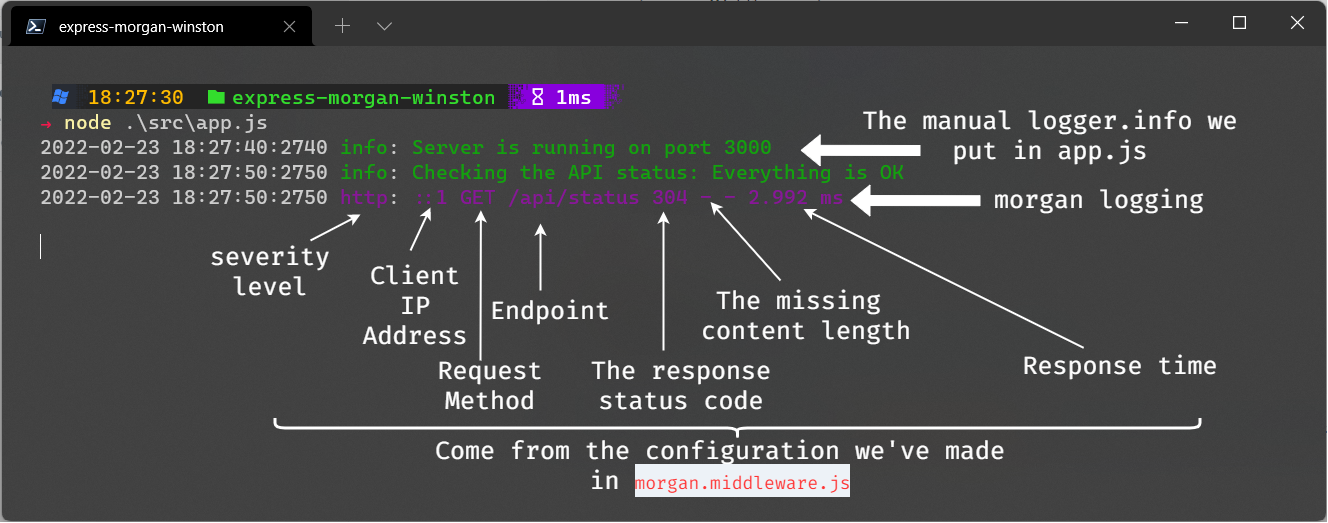
Run the app using the command node src/app.js and call the API status endpoint. Below is how my terminal looks like:
You can notice that a log file named logs/all.log was automatically generated and contains all log messages.
Source code
Our final project structure looks like below:
📘express-morgan-winston/
┣ 📁logs/
┃ ┣ ✨all.log
┃ ┗ ✨error.log
┣ 📁src/
┃ ┣ 📁middlewares/
┃ ┃ ┗ ✨morgan.middleware.js
┃ ┣ 📁utils/
┃ ┃ ┗ ✨logger.js
┃ ┗ ✨app.js
┣ ✨package-lock.json
┗ ✨package.json
Check out the source code on my GitHub organization Lioncoding-oss.
Support
If you find this blog post useful, please share it on your favorite social media. Don’t forget to follow me on GitHub and Twitter. To send me a message, please use the contact form or DM me on Twitter.
Useful links
- How To Use morgan in Your Express Project | DigitalOcean
- Better logs for ExpressJS using Winston and Morgan with Typescript | by Andrea Vassallo | Level Up Coding (gitconnected.com)
- expressjs/morgan: HTTP request logger middleware for node.js (github.com)
- winstonjs/winston: A logger for just about everything. (github.com)