

Table Of Contents
Introduction
Uploading files is a common task in today's digital world. However, when dealing with large files or unstable network connections, uploads can often fail, leading to a poor user experience. To solve this problem, you can implement resumable file uploads.
In this blog post, you will learn how to implement it using .NET.
What is Resumable File Uploads ?
Resumable file uploads is a mechanism that allows users to resume file uploads from where they left off in case of a network failure or manual pause, instead of starting over from the beginning.
Tus Protocol: Resumable File Uploads Made Easier
Tus is a dedicated protocol designed specifically for facilitating resumable file uploads. It is an open standard for reliable and resumable file uploads over HTTP.
There are many server-side and client-side implementations of the protocol in different programming languages.
In this blog post, we will use the official implementation for .NET, which is tusdotnet.
tusdotnet is a .NET server implementation of the Tus protocol that runs on .NET Framework, .NET Standard, .NET6, and later.
Setting Up Your .NET Core Project
Create a new .NET 8 minimal API project or use an existing one. Install the tusdotnet package using the dotnet CLI or the Package Manager
dotnet add package tusdotnet
Install-Package tusdotnet
How tusdotnet works
Before jumping directly into the code, let's see how the library works. Understanding this will facilitate the implementation process.
Firstly, you need to define your tus configurations, create handlers to manage the events you want to handle depending on your use case, and define the tus endpoint.
Configurations mean:
- Specify the store (where data will be stored). Tus only implements disk store but you also can implement a custom data store.
- Define allowed file extensions, file size limit, etc.
- Define events that you want to handle during the file upload process on the server side.
- Define expiration time for incomplete upload (due to network issues or when the user hits pause manually).
💡 Note that before all these events are triggered, you can use different configurations for each request.
Events in tusdotnet
In tusdotnet, events allow you to control distinct phases of the upload process. These events include, in order, OnAuthorize, OnBeforeX, and OnXCompleted.
For example:
- The
OnAuthorizeevent is the first event to fire once a tus request is made. This event is useful if you want to authorize the user or not. Consider a scenario where only users with a valid subscription can upload files with a resumable feature. - The
OnBeforeCreateevent fires before the file is created. Here, you can control whether the file metadata are correct or not. - The
OnFileCompletedevent happens when the file is successfully and completely uploaded. This event is especially useful when you want to add extra processing to the file, such as scanning for viruses, encryption, removing exif metadata, or moving the file to another location, etc.
Implementation
Below is a skeleton demonstrating how to use tusdotnet in a single file (Program.cs)
using tusdotnet.Stores;
using tusdotnet.Stores.FileIdProviders;
var builder = WebApplication.CreateBuilder(args);
var app = builder.Build();
// ... omitted to enhance readability
app.MapTus("/files", async httpContext => new()
{
// This method is called on each request
// so different configurations can be returned per user, domain, path, etc.
// Return null to disable tusdotnet for the current request.
// Where to store data?
Store = new TusDiskStore(directoryPath: "C:\\location",
deletePartialFilesOnConcat: false,
bufferSize: TusDiskBufferSize.Default,
fileIdProvider: new GuidFileIdProvider()
),
// Note that the web server or operating system might still restrict the size
// Configure Kestrel accordingly.
MaxAllowedUploadSizeInBytes = ...,
// Events
Events = new()
{
OnAuthorizeAsync = OnAuthorizecEventHanlder
OnBeforeCreateAsync = OnBeforeCreateHandler
OnFileCompleteAsync = OnFileCompleteEventHandler
},
// Use null to indicate no expiration limit for incomplete uploads.
// AbsoluteExpiration(timeout) or SlidingExpiration(timeout)
Expiration = ...
});
app.Run()
💡 Now that you know how the library works, you can implement your tus server depending on your use case.
Our Todo list
For this blog post, you will learn how to put the following elements together:
- Define configurations in
appsettings.json. - Add authentication support to your minimal API using the new Identity API endpoints introduced in .NET 8.
- Configure Cross-Origin Resource Sharing (CORS) to allow clients to upload files.
- Move the MapTus callback to another file.
- Implement event handlers.
- Create a background job to clean up incomplete uploads that have expired.
Configurations
You can include the following configurations in your appsettings file and update them as needed, based on your requirements.
"Tus": {
"StorageDiskPath": "/store/files",
"MaxRequestBodySize": 0,
"EnableExpiration": true, // If false, clean-up services will be disabled
"AbsoluteExpiration": true,
"ExpirationInSeconds": 300 // 5 min
}
To read these values, create the following TusDiskStorageOptions class:
public class TusDiskStorageOptions
{
[Required]
public string StorageDiskPath { get; set; }
public int MaxRequestBodySize { get; set; }
public bool EnableExpiration { get; set; }
public bool AbsoluteExpiration { get; set; }
public int ExpirationInSeconds { get; set; } = 300
}
You can use the Options pattern to inject the value of TusDiskStorageOptions into the services container.
To do that, let's create a static class called DependencyInjection for all our extension methods.
public static class DependencyInjection
{
internal static void AddTusServices(this IServiceCollection services, IConfiguration configuration)
{
services.AddOptions<TusDiskStorageOptions>()
.BindConfiguration("Tus")
.ValidateDataAnnotations()
.ValidateOnStart()
.PostConfigure(ConfigureStoragePath); // 👈 Create the StorageDiskPath location
services.AddSingleton(resolver =>
resolver.GetRequiredService<IOptions<TusDiskStorageOptions>>().Value);
}
}
ConfigureStoragePath is a callback function that verifies whether the storage location exists and, if not, creates it.
internal static void ConfigureStoragePath(TusDiskStorageOptions options)
{
if (Directory.Exists(options.StorageDiskPath)) return;
Directory.CreateDirectory(options.StorageDiskPath);
}
💡 If Directory.CreateDirectory throws an exception, the app will crash at startup. So, make sure that all requirements are met for the path to create the corresponding directory.
Since we define MaxRequestBodySize in our configurations, let's configure Kestrel to set the MaxRequestLength setting accordingly.
internal static void ConfigureKestrelFileUpload(this WebApplicationBuilder builder)
{
builder.WebHost.ConfigureKestrel(options =>
{
var maxRequestBodySize = builder.Configuration.GetValue<int>("Tus:MaxRequestBodySize");
options.Limits.MaxRequestBodySize = maxRequestBodySize == 0 ? null : maxRequestBodySize;
});
}
Authentication support
Update the DependencyInjection to include the implementation of the AddDatabase extension method, which will contain the configuration for the DbContext and the Identity features.
internal static void AddDatabase(this IServiceCollection services)
{
// 👇 DbContext with SQLite support
services.AddDbContext<ApplicationDbContext>(options => { options.UseSqlite("Data Source=database.db"); });
// 👇 Authentication
services.AddIdentityApiEndpoints<IdentityUser>(options =>
{
options.Lockout.DefaultLockoutTimeSpan = TimeSpan.FromMinutes(30);
})
.AddEntityFrameworkStores<ApplicationDbContext>();
}
Your Program.cs should now look like the following:
var builder = WebApplication.CreateBuilder(args);
var app = builder.Build();
// ... omitted
builder.Services.AddAuthorization(); // 👈
builder.ConfigureKestrelFileUpload();
builder.Services.AddTusServices(builder.Configuration);
builder.Services.AddDatabase(); // 👈
// ... omitted
app.MapGroup("/users").MapIdentityApi<IdentityUser>() // 👈
.WithTags("users");
app.UseAuthorization(); // 👈
app.Run();
CORS configurations
To allow clients (browsers, etc.) to upload a file from different domains, you will need to enable Cross-Origin Resource Sharing (CORS).
tusdotnet has a helper that returns the headers needed for the tus protocol to work over CORS.
Create an extension method in the DependencyInjection class.
public const string TusCorsPolicyName = "TusCorsPolicy";
internal static void ConfigureTusCors(this IServiceCollection services)
{
services.AddCors(options =>
{
options.AddPolicy(name: TusCorsPolicyName, policyBuilder =>
{
policyBuilder.AllowAnyOrigin() // 👈 Define Origins here
.AllowAnyHeader()
.AllowAnyMethod()
.WithExposedHeaders(CorsHelper.GetExposedHeaders()); // 👈 Tus helper for headers
});
});
}
Use the extension method in the Program.cs file.
// ... omitted
builder.Services.ConfigureTusCors(); // 👈 Configure CORS
var app = builder.Build();
app.UseCors(TusCorsPolicyName); // 👈 Use CORS
// ... omitted
Tus endpoint Handler
In your Program.cs file, add the Tus endpoint and secure it using the RequireAuthorization() function.
// Add tus endpoint
app.MapTus("/upload", UploadService.TusConfigurationFactory)
.RequireAuthorization();
With RequireAuthorization() added to the tus endpoint, there's no longer a need to handle the OnAuthorize event unless you want to do something more specific per request. All that's required now is to define the tus Configuration Factory and event handlers.
public static class UploadService
{
internal static Task<DefaultTusConfiguration> TusConfigurationFactory(HttpContext httpContext)
{
// 👇 Get TusDiskStorageOptions from the services container
var tusDiskStorageOptions = httpContext.RequestServices.GetRequiredService<TusDiskStorageOptions>();
var config = new DefaultTusConfiguration
{
Store = new TusDiskStore(directoryPath: tusDiskStorageOptions.StorageDiskPath,
deletePartialFilesOnConcat: false, // Default value is not set
bufferSize: TusDiskBufferSize.Default, // Default value is not set
fileIdProvider: new GuidFileIdProvider()), // Default value is not set
MaxAllowedUploadSizeInBytes = tusDiskStorageOptions.MaxRequestBodySize == 0
? null
: tusDiskStorageOption.MaxRequestBodySize,
// 👇 Use the incoming request's PipeReader
UsePipelinesIfAvailable = true,
Events = new Events
{
OnBeforeCreateAsync = HandleOnBeforeCreateAsync,
OnFileCompleteAsync = HandleOnFileCompleteAsync,
},
};
if (tusDiskStorageOption.EnableExpiration)
{
config.Expiration = tusDiskStorageOptions.AbsoluteExpiration
? new AbsoluteExpiration(TimeSpan.FromSeconds(tusDiskStorageOptions.ExpirationInSeconds))
: new SlidingExpiration(TimeSpan.FromSeconds(tusDiskStorageOptions.ExpirationInSeconds));
}
return Task.FromResult(config);
}
// Event handlers go here
}
💡 The AbsoluteExpiration sets the expiration timeout once during file creation and is never updated thereafter.
On the other hand, SlidingExpiration sets the expiration timeout and is updated on every PATCH request. It's important to note that once the file upload is completed, it will not be marked as expired.
HandleOnBeforeCreateAsync will validate metadata, in our case, the file name and the content type. Note that the client must add these metadata to the tus request.
 private static Task HandleOnBeforeCreateAsync(BeforeCreateContext ctx)
{
// Partial files are not complete, so we do not need to validate
// the metadata in our example.
if (ctx.FileConcatenation is FileConcatPartial)
{
return Task.CompletedTask;
}
if (!ctx.Metadata.TryGetValue("name", out Metadata? nameValue) || nameValue.HasEmptyValue)
{
ctx.FailRequest("name metadata must be specified. ");
}
if (!ctx.Metadata.TryGetValue("type", out Metadata? contentTypeValue) || contentTypeValue.HasEmptyValue)
{
ctx.FailRequest("content Type metadata must be specified. ");
}
return Task.CompletedTask;
}
private static async Task HandleOnFileCompleteAsync(FileCompleteContext ctx)
{
var logger = ctx.HttpContext.RequestServices.GetRequiredService<ILogger<Program>>();
var file = await ctx.GetFileAsync();
logger.LogInformation("File {FileId} upload finished", file.Id);
}
HandleOnFileCompleteAsync will print the file ID to the log. The file ID here is different from the file name. It's a random GUID provided by the GuidFileIdProvider class we specified earlier in our tus configuration.
💡 To create a custom fileId provider, you should extend the ITusFileIdProvider interface and implement your specific business logic.
Clean up expired file
Cleaning up expired files is not part of the tus protocol. However, if the Expiration property is enabled on the ITusConfiguration, it's important to remove uncompleted file uploads to free up storage.
tusdotnet provides an API to delete or retrieve expired files.
To implement your cleanup service, you can use .NET's Hosted Services, Quartz.NET, or any library that is designed for building a long-running background job.
Here's a Quartz implementation example:
[DisallowConcurrentExecution]
public sealed class ExpiredFilesCleanupJob : IJob
{
private readonly ITusExpirationStore _expirationStore;
private readonly ExpirationBase? _expiration;
private readonly ILogger<ExpiredFilesCleanupJob> _logger;
public ExpiredFilesCleanupJob(ILogger<ExpiredFilesCleanupJob> logger, DefaultTusConfiguration config)
{
_logger = logger;
_expirationStore = (ITusExpirationStore)config.Store;
_expiration = config.Expiration;
}
public async Task Execute(IJobExecutionContext context)
{
try
{
_logger.LogInformation("Running cleanup job...");
var numberOfRemovedFiles = await _expirationStore.RemoveExpiredFilesAsync(context.CancellationToken);
_logger.LogInformation(
"Removed {NumberOfRemovedFiles} expired files. Scheduled to run again in {TimeoutTotalMilliseconds} ms",
numberOfRemovedFiles, _expiration?.Timeout.TotalMilliseconds);
}
catch (Exception exc)
{
_logger.LogError("Failed to run cleanup job {ExceptionMessage}", exc.Message);
}
}
}
As you can notice, the background service needs the tus configuration to access the store. Let's add the tus configuration to the DI container as a singleton and register the background job. Update the AddTusServices extension method by appending the following code.
internal static void AddTusServices(this IServiceCollection services, IConfiguration configuration)
{
// ... ommitted
var tuskDiskStorageOption = configuration.GetSection("Tus").Get<TusDiskStorageOptions>();
var tusDefaultConfig = new DefaultTusConfiguration
{
Store = new TusDiskStore(tuskDiskStorageOption?.StorageDiskPath),
Expiration = tuskDiskStorageOption switch
{
{ EnableExpiration: true, AbsoluteExpiration: true } => new AbsoluteExpiration(
TimeSpan.FromSeconds(tuskDiskStorageOption.ExpirationInSeconds)),
{ EnableExpiration: true, AbsoluteExpiration: false } => new SlidingExpiration(
TimeSpan.FromSeconds(tuskDiskStorageOption.ExpirationInSeconds)),
_ => null
}
};
services.AddSingleton(tusDefaultConfig);
// If expiration is not enabled, bypass the registration of the background job.
if (tuskDiskStorageOption is not { EnableExpiration: true }) return;
services.AddQuartz(q =>
{
var jobKey = new JobKey(nameof(ExpiredFilesCleanupJob));
q.AddJob<ExpiredFilesCleanupJob>(opts => opts.WithIdentity(jobKey));
q.AddTrigger(opts => opts
.ForJob(jobKey)
.WithIdentity($"{nameof(ExpiredFilesCleanupJob)}-trigger")
.WithSimpleSchedule(s => s
.WithInterval(TimeSpan.FromSeconds(tuskDiskStorageOption.ExpirationInSeconds))
.RepeatForever())
);
});
services.AddQuartzHostedService(q => q.WaitForJobsToComplete = true);
}
Upload a file to the store
To upload a file, you will need to use a tus client. You can find an official client on the tus website. For a front-end app, the most popular tus client is tus-js-client. Another excellent choice is Uppy, which is an open-source file uploader that supports tus and is built by the people behind the protocol.
You can create a Vue 3 using pnpm and vite with the following command:
> pnpm create vite
Then add the following uppy packages:
{
"name": "uploadclient",
"private": true,
"version": "0.0.0",
"type": "module",
"scripts": {
"dev": "vite",
"build": "vite build",
"preview": "vite preview"
},
"dependencies": {
"@uppy/core": "^3.9.2",
"@uppy/dashboard": "^3.7.4",
"@uppy/drag-drop": "^3.0.3",
"@uppy/file-input": "^3.0.4",
"@uppy/progress-bar": "^3.0.4",
"@uppy/tus": "^3.5.3",
"@uppy/vue": "^1.1.2",
"vue": "^3.4.19"
},
"devDependencies": {
"@vitejs/plugin-vue": "^5.0.4",
"vite": "^5.1.4"
}
}
Below is the content of my App.vue file
<script setup>
import {Dashboard} from '@uppy/vue'
</script>
<template>
<div id="app">
<Dashboard
:uppy="uppy1"
:plugins="[]"
/>
</div>
</template>
<script>
import Uppy from '@uppy/core'
import Tus from '@uppy/tus'
import {defineComponent} from 'vue'
export default defineComponent({
computed: {
uppy1: () =>
new Uppy({
id: 'uppy1',
autoProceed: false,
restrictions: { // Define restrictions. check out the doc for more info
maxNumberOfFiles: 2,
minNumberOfFiles: 1,
// allowedFileTypes: ['image/*', 'video/*', 'application/pdf']
},
})
.use(Tus, {
endpoint: "http://localhost:5034/upload/", // Your tus endpoint
headers: {
// Get user access token from local storage
"Authorization": "Bearer TOKEN_VALUE"
},
}),
}
})
</script>
<style src="@uppy/core/dist/style.min.css"></style>
<style src="@uppy/dashboard/dist/style.min.css"></style>
<style src="@uppy/drag-drop/dist/style.min.css"></style>
💡 Our backend API provides endpoints for user registration and authentication, feel free to implement your login mechanism in the front-end part. For testing, you can create an account and request an access token using the swagger and set the value of the Authorization directly in the code.
We discussed metadata in the API section, it's important to note that Uppy automatically adds these metadata.
Run your front-end using the pnpm run dev :
> pnpm run dev
VITE v5.1.4 ready in 362 ms
➜ Local: http://localhost:5173/
➜ Network: use --host to expose
➜ press h + enter to show help
Navigate to the URL provided by the command above and upload files

Files have been successfully uploaded.
To test the resumable feature, select a large file, initiate the upload, and then pause it. If the pause does not exceed the expiration timeout specified in the tus configuration, the upload will resume from where it was stopped.

Data in the store
Files are uploaded to the path defined for the tus DiskStore. Now, let's explore the various types of files present:
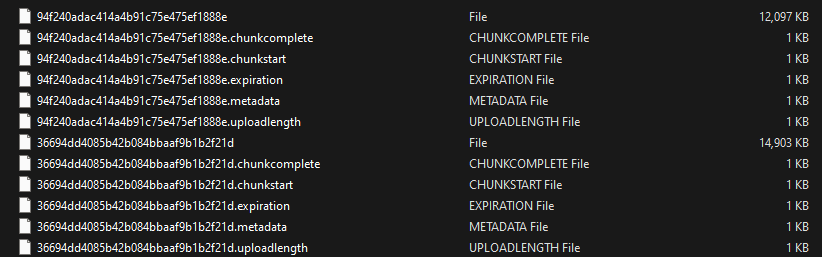
- Files without an extension represent the uploaded files, with their names replaced by a randomly generated GUID.
- Files with a
.metadataextension contain metadata related to the uploaded files. These metadata typically include the original file name and content type, with all values encoded into base64.
> cat 94f240adac414a4b91c75e475ef1888e.metadata
relativePath bnVsbA==,name TkVULU1pY3Jvc2VydmljZXMtQXJjaGl0ZWN0dXJlLWZvci1Db250YWluZXJpemVkLU5FVC1BcHBsaWNhdGlvbnMucGRm,type YXBwbGljYXRpb24vcGRm,filetype YXBwbGljYXRpb24vcGRm,filename TkVULU1pY3Jvc2VydmljZXMtQXJjaGl0ZWN0dXJlLWZvci1Db250YWluZXJpemVkLU5FVC1BcHBsaWNhdGlvbnMucGRm
- Files with the
.uploadlengthextension store the length in bytes.
> cat 94f240adac414a4b91c75e475ef1888e.uploadlength
12386392
- Files with the
.chunkcompletedextension indicate whether the upload process is completed or not, denoted by a binary value of 0 or 1.
Resources for some advanced scenarios
- Limit upload speed: https://github.com/tusdotnet/tusdotnet/issues/78
- Upload files back to Azure Storage: https://github.com/giometrix/Xtensible.TusDotNet.Azure
- Implement a custom data store: https://github.com/tusdotnet/tusdotnet/wiki/Custom-data-store
Final thoughts
I hope this article has helped you learn how to implement resumable file uploads.
In the upcoming articles, we will explore how to download files from the DiskStore and make the tus endpoints visible on your swagger ui.
The complete source code can be found on GitHub.
If you find this blog post useful, please share it on your favorite social media. Don't forget to follow me on GitHub and Twitter. To send me a message, please use the contact form or DM me on Twitter.
Share

Microsoft MVP | Founder


Related Posts
Quick Links